3D crystal engraving is a precise process that combines image quality, depth processing, and laser accuracy. Even with the right tools, small 3D crystal engraving mistakes can significantly reduce the quality of your final engraving.
The good news is that most of these issues are easy to fix once you understand what to look for.
In this guide, we will cover the most common mistakes in 3D crystal engraving and how to avoid them to achieve consistent, professional results.
Why Avoiding Mistakes Matters
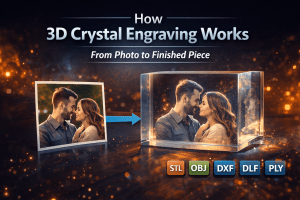
Every engraving is created from a combination of image data and processing settings. If something goes wrong at any stage, it can affect the final result. To better understand how these steps work together, see our guide on how 3D crystal engraving works.
Common problems caused by mistakes include:
- Flat or unrealistic depth
- Loss of detail in key areas
- Harsh or unnatural features
- Wasted materials and time
By avoiding these mistakes, you can improve quality, reduce rework, and create better engravings more efficiently.
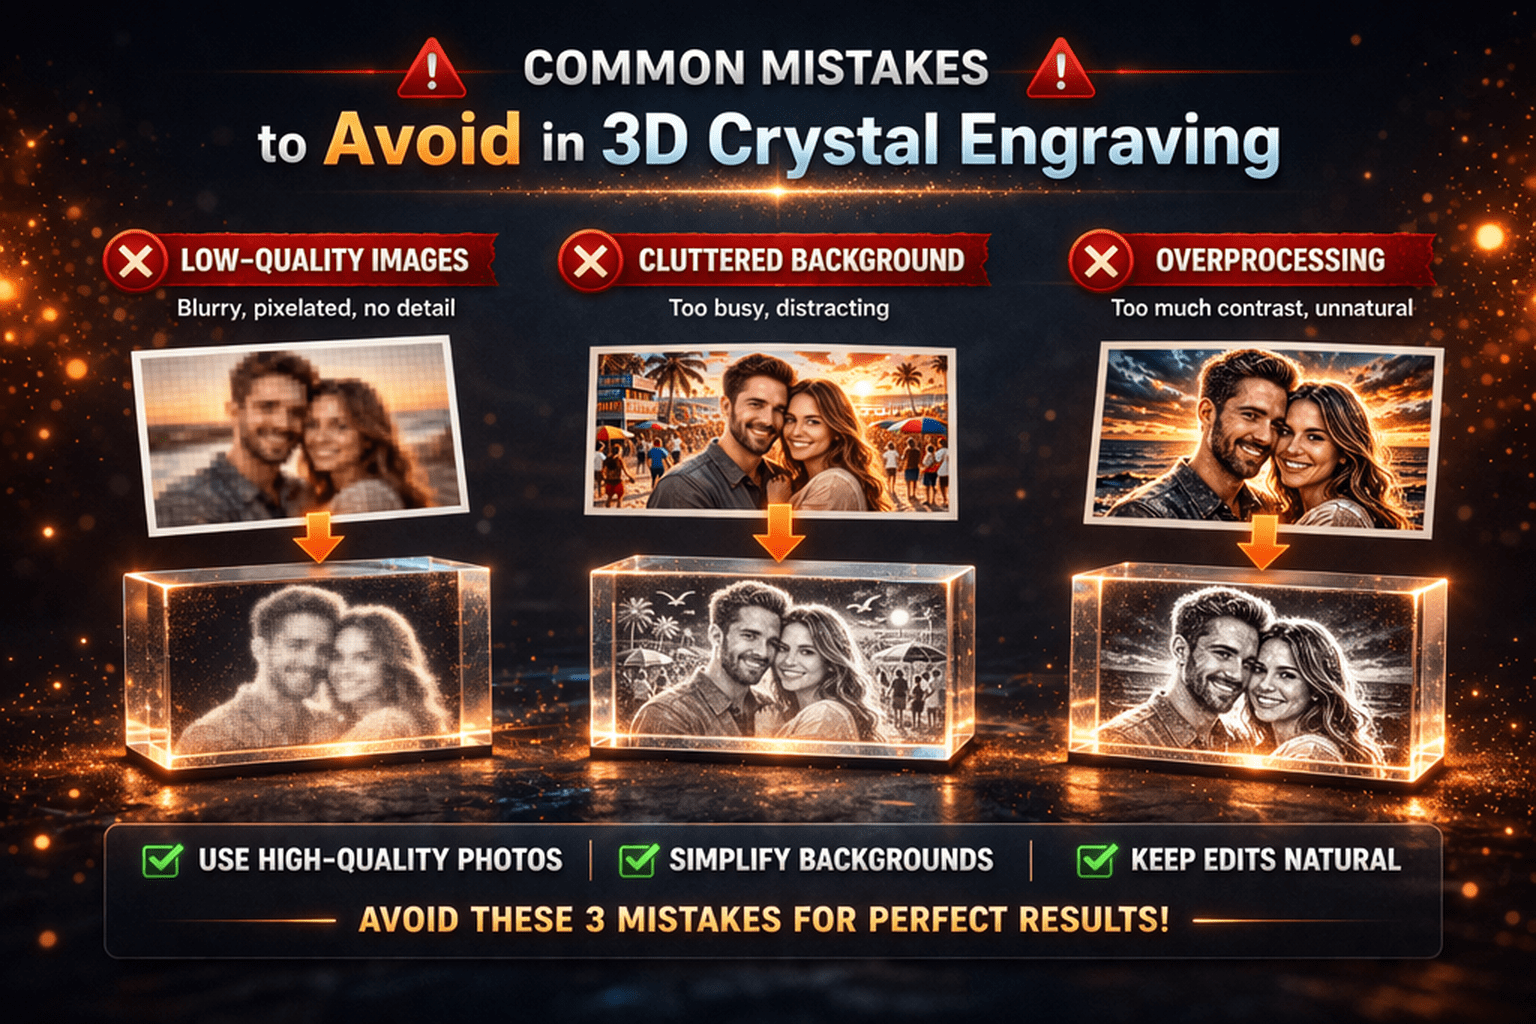
1. Using Low-Quality Images
One of the most common mistakes is starting with a poor-quality image. Using a low-quality photo results in weak dot density and flat depth mapping, causing faces to appear washed out or lacking detail in the final crystal. The engraving can only be as good as the source photo. To avoid this, see our guide on what makes a good photo for crystal engraving.
Issues caused by low-quality images:
- Blurry or soft details
- Pixelation and noise
- Poor depth generation
Best practices:
- Use high-resolution images whenever possible
- Ensure the subject is clear and well-defined
- Avoid heavily compressed or low-quality files
Starting with a strong image is the foundation of a great engraving.
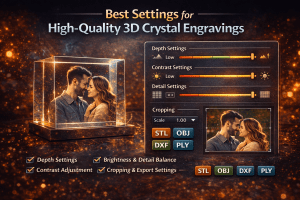
2. Overprocessing the Image
It is common to push settings too far in an attempt to enhance detail, but overprocessing often leads to worse results. For better control, see our guide on the best crystal engraving settings.
Common overprocessing issues:
- Excessive contrast that creates harsh edges
- Too much depth causing distortion
- Over-sharpening that introduces noise
The result is an engraving that looks unnatural and overly aggressive.
Best approach:
- Make small, controlled adjustments
- Focus on maintaining natural detail
- Avoid extreme settings unless necessary
3. Ignoring Background Cleanup
Backgrounds play a larger role than many users expect. A cluttered or busy background can reduce clarity and distract from the main subject.
Problems caused by poor backgrounds:
- Loss of focus on the subject
- Unwanted noise in the engraving
- Reduced overall detail clarity
Best practices:
- Remove or simplify the background
- Use background removal tools when needed
- Keep the focus on the main subject
A clean background significantly improves the final result.
4. Poor Cropping
Improper cropping can reduce the effective resolution of your subject and limit detail quality.
Common issues:
- Too much empty space around the subject
- Subject appearing too small in the frame
- Reduced detail density in the engraving
Best practices:
- Crop tightly around the subject
- Center the subject within the frame
- Maximize the use of available image space
Good cropping improves clarity and detail without changing the original image quality.
5. Using Too Much Depth
Depth is essential for creating a three-dimensional effect, but more depth does not always mean better results.
Problems caused by excessive depth:
- Distorted facial features
- Unnatural proportions
- Harsh transitions between layers
Best practices:
- Use moderate depth for portraits
- Keep transitions smooth and natural
- Avoid pushing depth to extremes
Balanced depth produces more realistic and visually appealing engravings.
6. Not Testing Settings Before Production
Skipping test runs can lead to wasted materials and inconsistent results.
Common issues:
- Unexpected engraving quality problems
- Incorrect depth or contrast settings
- Misaligned scaling or spacing
Best practices:
- Test settings on smaller crystals first
- Review results before final production
- Adjust settings based on test outcomes
Testing helps ensure predictable and consistent results.
7. Incorrect Export Settings
Even a perfectly processed image can fail if export settings are incorrect.
Common export issues:
- Using the wrong file format
- Incorrect scaling for the crystal size
- Inconsistent point spacing
Best practices:
- Use the correct format such as OBJ, STL, PLY, or DXF
- Verify scale and dimensions before exporting
- Ensure compatibility with your engraving machine
Proper export settings are essential for accurate engraving.
8. Using the Wrong Software or Workflow
The tools you use have a direct impact on your results. Generic image tools are not designed for 3D crystal engraving and often produce inconsistent output.
Problems with improper tools:
- Poor depth generation
- Limited control over engraving settings
- Inconsistent results across images
Using specialized software like CrystalMe3D Pro provides:
- Accurate depth generation
- Advanced detail control
- Reliable and repeatable results
This ensures a more efficient and professional workflow.
Conclusion
Avoiding common mistakes is one of the fastest ways to improve your 3D crystal engraving results. Small adjustments in image selection, processing, and export settings can make a significant difference.
By following best practices and using the right tools, you can consistently produce clean, detailed, and professional-quality engravings.
With software like CrystalMe3D Pro, it becomes easier to control every step of the process and achieve reliable, high-quality results.